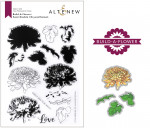
3 different techniques, 1 floral stamp set!
Hello there! It's Laurie here today with a few new projects using the latest Build-A-Flower: Semi Double Chrysanthemum. This is a gorgeous new bloom with lots of possibilities, and today, I have 3 cards showcasing 3 different ways to use the set.
 Using an outline image for a heat embossed background is a great way to stretch your images. While this set has the images to add color, this outline looks amazing with a little ink blending. After embossing the bloom several times, I blended ink all around the card front panel and then did a little darker ink in the centers just for a tiny bit of depth.
 To create a background with a little more depth, I cut the panel into strips and added it to the card from with foam tape. Quick and easy dimension for sure! Last, I die cut the Fancy Hello Die in fun foam and again in white cardstock, attaching them together with liquid glue and then adding it to the card front.
 Another way to use the Semi Double Chrysanthemum set is just to focus on a single bloom.
 To add a little background detail, I used the large stamp from Kind Confetti for a light image on the card base. Using the outline stamps and the filler images, I stamped out this yellow bloom and the leaves from the set.
 Build-A-Flower: Columbine Layering Stamp & Die Bundle has the perfect stem, so I added it to the card front using the same green I used for the leaves. I found the perfect sentiment in Engraved Flowers and stamped that with Obsidian Pigment Ink along the bottom. Last, I popped the flowers and leaves up on foam tape.
 One last technique you can use for these beautiful flowers is to layer them in the background under another element. Circled Greetings: Hello Die is one of my favorites to add in a sentiment.
 After die cutting the hello from the front of the card panel, I layered a yellow panel behind. To give it a little extra detail, I used Classy Stripes stenciled in Chamomile Crisp Dye Ink and then stacked the blooms and leaves.
 To adhere the panels together, I used liquid glue and then attached the panel to the card base.

I am so glad you stopped in today. Hope you have a great week!
SUPPLY LIST:
|