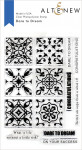
Stamp Focus: Dare to Dream
Hello, everyone! It's Aga here with a Stamp Focus post on the newly released Dare to Dream Stamp Set.
This set contains six beautiful ornamental stamps along with sentiments that you can mix and match. Each decorative element can be stamped as is or paired with the additional layering image for creating a more detailed design. I love how easy is to create pretty patterns using these stamps with hardly any effort!
Today, I created three stamped background patterns to give you a few different ideas of using this set.
For my first card, I created a monochromatic background. I started by stamping my pattern with the first design element in Dusk Crisp Dye Ink. Next, I added the second element in Iceberg Crisp Dye Ink on top of the first one.

To finish my card, I used floral elements from the Perfectly Perfect Stamp & Die Set. I stamped them in black and used green markers from Artist Markers Set E to do a simple coloring. My last step was to add a sentiment stamped in black onto a label created with Dot Labels Die Set.

TIP! There’s no need to limit yourself to using only one or two elements, mixing them up gives even more possibilities for fun patterns.
For my next card, I reproduced an inspiration from a tri-fold insert card included in the Dare to Dream Stamp Set to show you how the sample project will look in real life. I used all six decorative stamps and the following Altenew Crisp Dye Inks: Blush, Pinkalicious, Sunkissed, Orange Cream, Vanilla Cream, and Hazelnut.

As a final step, I die cut the “dare” word out of black cardstock using the Fine Alphabet Die Set and stamped the other words to complete the sentiment.
 For my last card, I wanted to create a bold and colorful background. I started by stamping the first layer of my pattern with Desert Night Crisp Dye Ink, then I used the second decorative element and stamped it with Lagoon Crisp Dye Ink on top of the first layer. To add more interest to the background, I used the Sunkissed Marker from Artist Markers Set E to color some of the elements.

To finish the card, I added a “hello” sentiment using the Fine Alphabet Die Set.
 I hope you’ve enjoyed these examples and you found some inspiration today! I can’t wait to see all your beautiful patterns created with this set!
Thank you for stopping by today!
Looking for ways to get more use out of your background stamps? Wanting to use them creatively? Look no further! Check out our Background Magic: Background Stamps with Creativity Class. Sign up HERE.

~SUPPLY LIST~
|